 | Managing the Display |
| Prev | Using NeuroScope | Next |
As mentioned previously, channels can be selected by clicking on the corresponding circles in the palettes. Clicking on a group ID (the number on the left side of a group box) will select or deselect all the channels in the group at once. Another, more graphical way is to directly click on the traces in the display using the Select Channels tool. To activate this tool, select -> or click on
 . Use Ctrl for multiple selections (see Labels and Calibration Bars for yet another way to select channels).
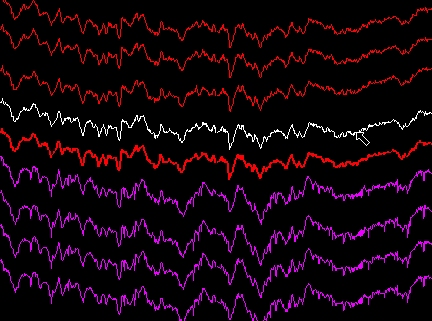
In order to make individual channels as well as channel groups more readily visible, channels can be colored using three different schemes:
By Anatomical Group: A color can be assigned to all the channels in a given anatomical group by middle-clicking on the group ID in the Anatomical Groups Palette. This brings up the Color Chooser. As soon as you validate your new choice, the palettes and display will be updated accordingly. The new colors are referred to as the Anatomical Group colors for the given channels.
By Spike Group: Similarly, a color can be assigned to all the channels in a given spike group by middle-clicking on the group ID in the Spike Groups Palette. The new colors are referred to as the Spike Group colors for the given channels.
By Channel: Additionally, an individual channel can also be assigned a color by middle-clicking on the corresponding circle in either palette.

Although each channel can only have one single color at a time, Anatomical Group colors and Spike Group colors are always kept in memory. This means that although assigning an individual channel a new color will change its color in the display, this will not override its Anatomical Group color nor its Spike Group color (in memory): these can still be later reactivated. Similarly, changing Anatomical Group colors does not affect Spike Group colors and vice versa.
To recolor all channels using Anatomical Group colors, select ->. Similarly, to recolor all channels using Spike Group colors, select ->.
Contrary to Anatomical Group colors and Spike Group colors, individual channel colors are not kept in memory. You can think of them as temporary colors: they are typically used when you need to temporarily identify one particular channel from the other channels in the same group.
When you first open a data file with NeuroScope, all the channels are shown in the display. But you can decide to hide some channels, for instance to temporarily focus on a subset of the data. To hide channels, select them (in either palette or directly in the display), and choose -> or click on
 . The remaining channels will be reorganized in the display to optimally utilize the available space. The circles in the palette will become hollow to indicate that the channels are now hidden (see the above figure).
To make hidden channels visible again, select the corresponding circles and choose -> or click on
 .
.
Channel amplitudes can be adjusted by selecting channels and choosing -> or ->. To adjust all channels at once, select -> or ->. To reset the amplitudes to their default (initial) settings, select channels and choose ->.
Channels can be offset by clicking on the traces and dragging them by the appropriate amount using the Select Channels tool. To activate this tool, select -> or click on
 . Use Ctrl for multiple selections (see Labels and Calibration Bars for yet another way to select channels). Notice that in order to provide visual feedback the traces become slightly thicker when the channels are selected using the Select Channels tool. As you drag them around, their new positions are indicated by white outlines. Upon releasing the mouse button, the traces will move to their new positions.

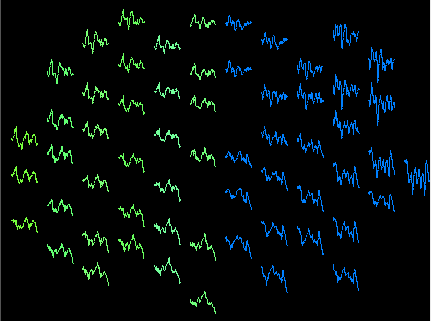
When the physical organisation of your electrodes is more complex than vertical arrays (e.g. epidural electrodes covering the surface of the brain), NeuroScope provides a way to store your electrode layout. This can be done by redefining the default offsets which are stored in the parameter file (see File Formats). To set the current offsets as the default offsets, select ->. To set the default offsets back to zero, select ->.

Defaut offsets can be reused for subsequent experiments. This can be done using NDManager, which is part of the larger data analysis framework including NeuroScope and Klusters. Alternatively, this can also be done manually by duplicating and modifing the parameter file (see File Formats).
| Prev | Home | Next |
| Editing Channel Groups | Up | Advanced Display Management |