 | Using NeuroScope |
| Prev | Next |
Table of Contents
To start a new session, select ->. In the Open dialog, you can select any type of data file (dat, eeg, nrs or xml: see File Formats).
A session can also be started from Konqueror by clicking on one of the above files, or on the command line by typing:
%neuroscopefilename
First, NeuroScope needs some information about the acquisition system. You will be prompted to provide this information in the Properties dialog. More generally, this dialog is where you can set all the parameters for the various files you view and edit (this will be presented in later sections of this manual). For now, suffice it to introduce the Channels tab, which is the only one enabled at this point.

All the fields are self-explanatory, but these fields may need clarification:
Initial offset: some acquisition systems record the data with a fixed offset; this can be specified here so that NeuroScope can recenter all the channels in the display.
Voltage range: the total voltage range, e.g. if the system is set to ±5V, the range is 10V.
Screen gain: millivolts per screen centimeter when the magnification level is set to 1x.
The information provided in the Properties dialog can be later displayed and modified at any time by selecting ->.
When starting NeuroScope from a terminal, this information can also be provided as command line options. To list available options, type
%neuroscope --helpUsage: neuroscope [Qt-options] [KDE-options] [options] file NeuroScope - Viewer for local field potentials, spikes and events Generic options: --help Show help about options --help-qt Show Qt specific options --help-kde Show KDE specific options --help-all Show all options --author Show author information -v, --version Show version information --license Show license information -- End of options Options: -r, --resolution Resolution of the acquisition system. -c, --nbChannels Number of channels. -o, --offset Initial offset. -m, --voltageRange Voltage range. -a, --amplification Amplification. -g, --screenGain Screen gain. -s, --samplingRate Sampling rate. -t, --timeWindow Initial time window (in miliseconds). Arguments: file Document to open.
The options provided on the command line will be displayed in the Properties dialog.
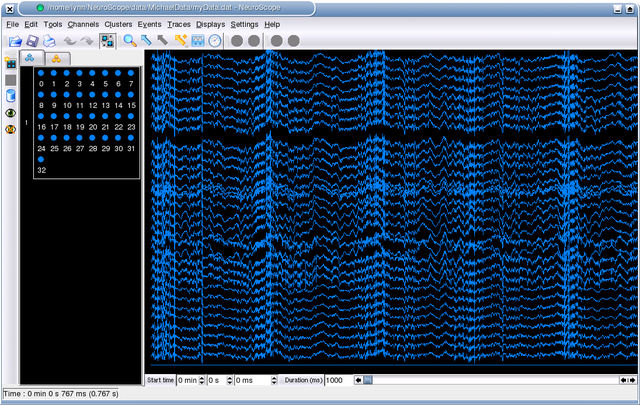
Once the information is properly set, the first 1000 ms of data are loaded and displayed in the main window, which should look like this:

Note: if the channel amplitudes are too large, they can be easily adjusted (see Traces).
The window contains two functionally distinct areas: the Palettes on the left, and the Display containing a Trace View on the right. These will be discussed in the following sections.
| Prev | Home | Next |
| Introduction | Up | Palettes |